Selection Sheet Manager Set-Up Options
Selection Sheet Manager Global Settings - SSM 1
Authority Class Settings - SSM 2
Selection Sheet Manager User Settings - SSM 3
Control User File Maintenance - SSM 5
Selection Sheet Manager Global Settings - SSM 1
These settings affect the Selection Sheet Manager across all of the systems in your organization. It should be noted that user settings take precedence over global settings.
Screen 4 - Default Print Settings
Screen 5 - Default Email Settings for Selections
Screen 7 - Attachments and SSM Notification Options
Screen 1
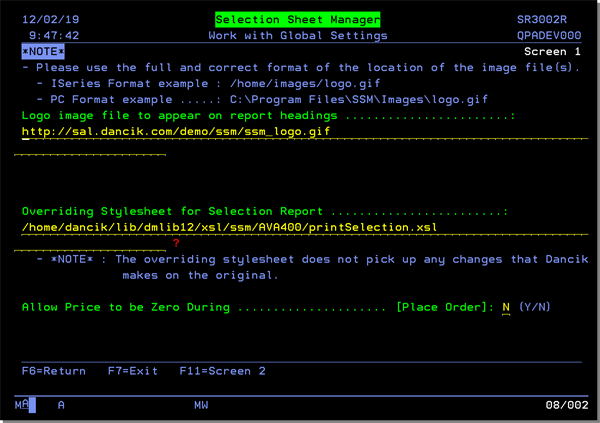
Logo image file to appear on report headings - Enter the URL where the company logo is located. Selection Sheet Manager uses this URL to insert the logo on reports. If this field is left blank, a logo will not display on invoices, reports, or any other printed item. If Selection Sheet Manager is running on a LAMP server, the image must be added to the LAMP server and not placed in a regular IFS Directory (i.e. iSeries Format).
Allow Price to be Zero During ... [Place Order] - This setting allows you to have selection items with no selling price. when there is no sell price. This setting can be useful in tracking things like service items or samples that do not have a sell price.
Screen 2
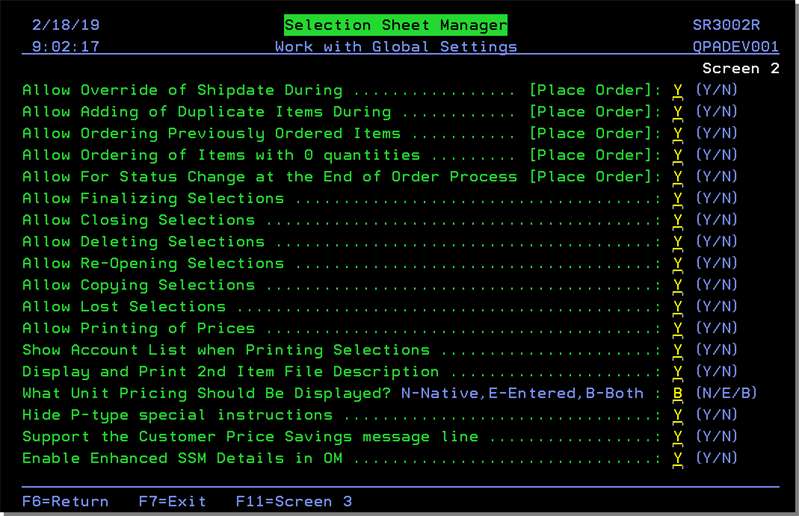
These fields grant or deny Selection Sheet Manager users the ability to perform certain tasks.
| Field | Description |
| Allow Override of Ship date During | Flagging this field to Y grants all Selection Sheet Manager users the ability to override ship dates. |
| Allow Adding of Duplicate Items During [Place Order] | By flagging this option to N (the default) you can minimize potential errors caused by fast double-clicking on the mouse. |
| Allow Ordering Previously Ordered Items | This flag, when set to Y, allows users to order items that have been ordered from the same selection sheet. |
| Allow Ordering of Items with 0 quantities | If this field is set to N, items that have a quantity of 0 will not even appear on the Selection Sheet Manager order form. |
| Allow For Status Change at the End of Order Process |
Activate this option to display a drop down menu on the last window of the selection process. This option works in conjunction with menu option SSM 15 - Work with Status to provide more detailed status codes for selection.
|
|
Allow Finalizing Selections Allow Closing Selections Allow Deleting Selections Allow Re-Opening Selections Allow Copying Selections Allow Lost Selections |
Flag these to Y to grant authority and N to deny access.
|
| Allow Printing of Prices | Enter a Y to allow prices to print on any reports generated. Enter an N to disable prices from printing. |
| Show Account List when Printing Selections | Activating this field, by entering a Y, directs the system to show all possible accounts used for pricing. |
| Display and Print 2nd Item File Description | Activating this setting pulls in the second line of the item description from the Item File. This information can be searched on and is displayed on screen and when a Selection Sheet is printed. |
| What unit pricing should be displayed? |
This option allows you to change the default pricing from the native pricing UM found pulled in from the Item File to pricing based on the entered UM. Prior to the introduction of this setting in 2015, the pricing for an item displayed in the native UM pulled from the item file. For some items, this is not the pricing that you want the customers to see. A typical scenario is an item that has a native UM of PC in the item file and SSM displays that pricing when the item is ordered. However the preferred UM for a quote is in SF.
The UM and item pricing are displayed on the Items tab of a Selection Sheet. All lines have a "yellow" price which shows the list price in the native unit of measure. The second "black" price is what is determined and showed by this setting. If an item has two quantities, two unit prices for the UMs will also display in the same order they appear in the quantity column. The first price shown is the list price. Some of the items might have three unit prices shown. This can happen for various reason such as the native UM, which is shown first, might have a no break policy on cartons. The unit pricing UM on printed PDFs would also adhere to this setting. |
| Hide P-type special instructions |
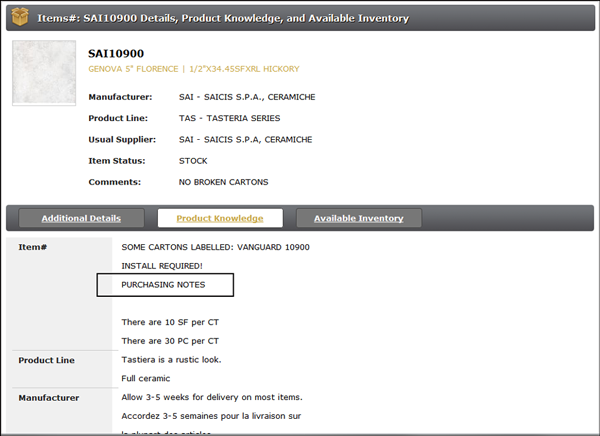
Enter a Y to hide notes/special instructions that are not applicable to sales. Purchasing Notes are included in the Product Knowledge section of the Item Detail window; unless they have been flagged to not appear. The Item Information window is accessed by clicking the item details icon
|
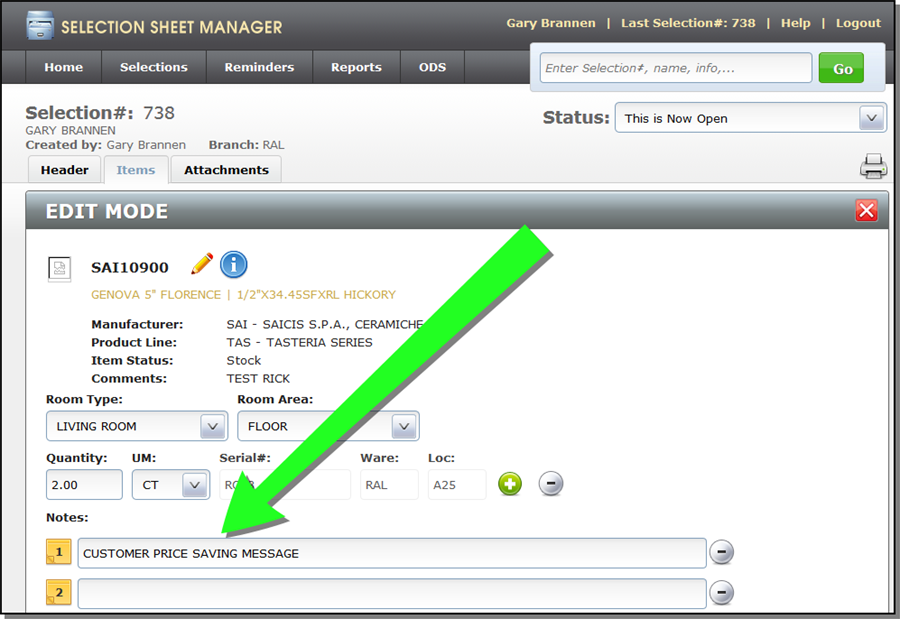
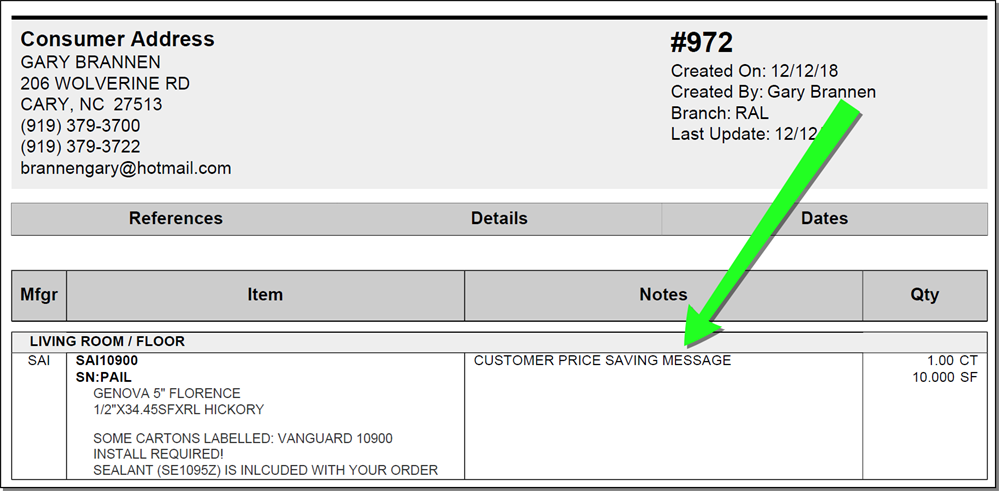
| Support the Customer Price Savings message line | This option allows a customer savings message to be printed on a customer order. If the setting Support the Customer Price Savings message line is enabled, the Customer Price Savings message line is added to the Notes section as line 1. The default for the setting is N.
The message is inserted into the Notes section of the selection sheet.
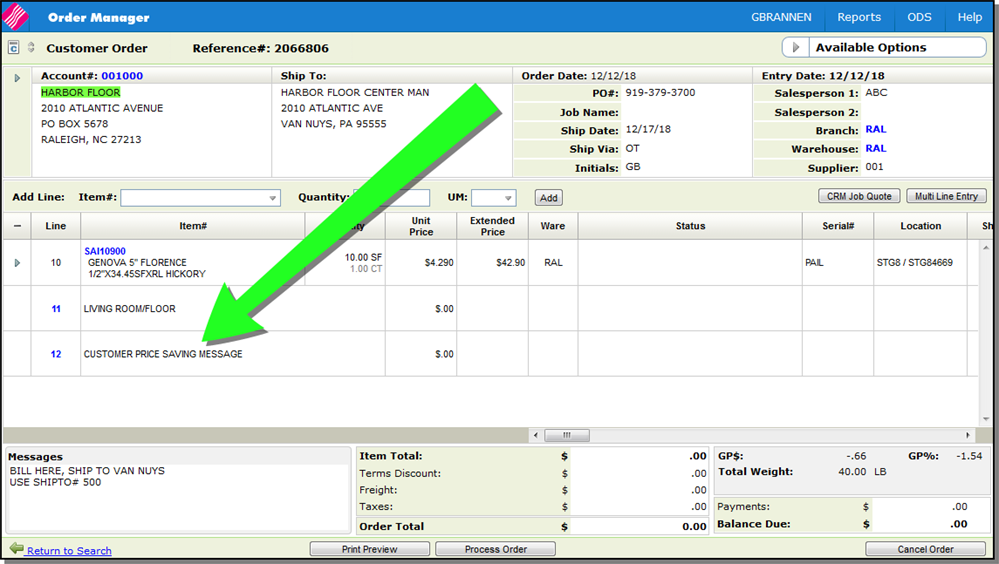
The pricing is validated/uploaded when a selection sheet is initially entered and also when it is updated. When the selection sheet is converted to an order in Navigator Order Management, the price savings message is inserted into the second message line; in this example line 12. The first line is reserved for the area designated on the selection sheet.
Associated FilesSystem Wide Setting - Options for Printing Price Savings on Customer DocumentsThis setting activates directs the system to automatically generate a message line that shows the customer how much they saved with any special pricing given them.
The customer must be authorized to see
pricing via the Customer
Preferences File. |
Screen 3
| Field | Description |
| Allow Report & ODS Tab Access |
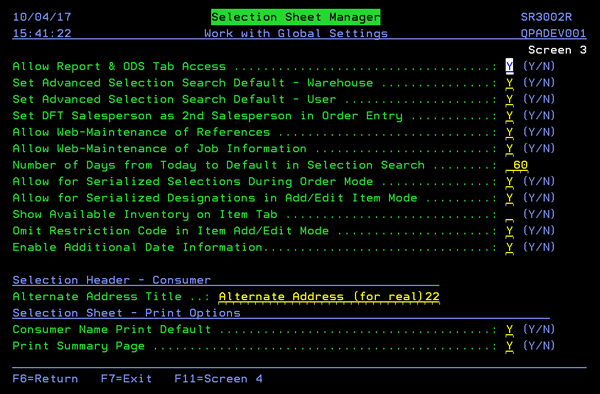
Enter a Y to display the Reports and ODS tabs on the Selection Sheet Manager.
The Reports tab gives access to reports that can be generated by a variety of parameters (status, manufacturer, item, area, room, etc.). The ODS tab provides easy access to the reports generated via the Reports tab. In order for a user to be able to access and work with the reports posted to ODS, they also need to have authority granted for the same profile on the iSeries via menu option ODS 1. Within ODS 1, find the option Work w/Reports Posted to Web and grant access. |
| Set Advanced Selection Search Default - Warehouse Set Advanced Selection Search Default - User |
Activating these options directs Selection Sheet Manager to use the default warehouse and/or user when searching through selection sheets. These 2 fields define the advanced search options for searches done via the master search bar. If set to "Y" only selection sheet results that my user created or are from my warehouse are returned. With these turned to "N" (which most people have at least initially all sheets are returned regardless of who put them in or from which warehouse/branch. |
| Set DFT Salesperson as 2nd Salesperson in Order Entry |
This setting, if activated, takes the default salesperson associated with your SSM user and uses it on the Header of the order (step 3 of the order process) as the secondary salesperson during Selection Sheet Manager order entry. If this setting is not activated, the default salesperson is used as the primary salesperson, but this can be overwritten by the salesperson associated with the buyer account Billto. |
| Allow Web-Maintenance of References |
Activating this setting provides the ability to add/edit/delete references. If a "Y" is entered a toolkit icon appears which allows you to Add/Edit/Deactivate records. |
| Allow Web-Maintenance of Job Information |
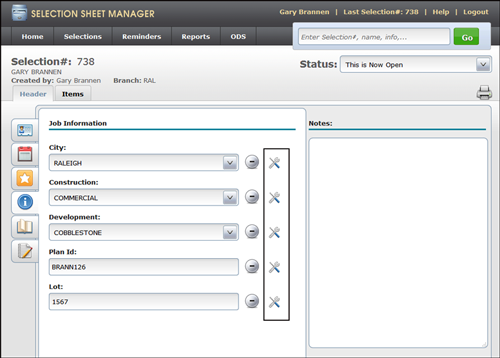
This setting gives users permission to edit the Job Information on a Selection Sheet. If a "Y" is entered a toolkit icon appears on the Job information tab.
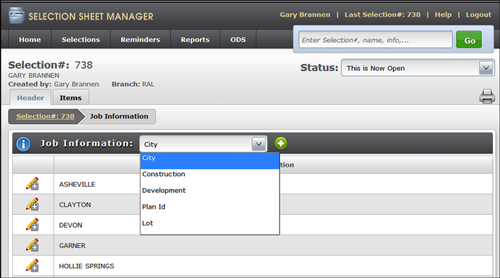
This toolkit icon allows you to Add/Edit/Deactivate records. Clicking the icon brings up the existing entries for that category; City, Construction, etc. Edit existing entries or add new ones as needed. To switch between job categories, use the drop down menu.
|
| Number of Days from Today to Default in Selection Search |
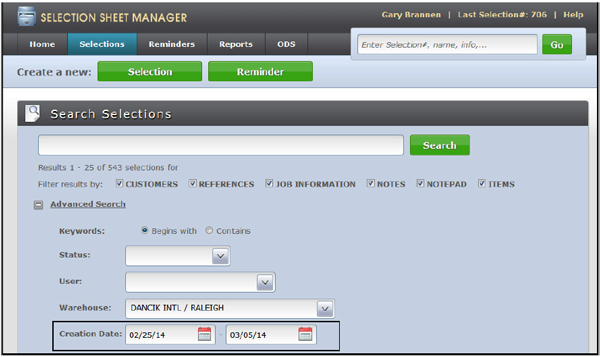
This setting allows you to enter a number of days as a default for the From and To Date Range for the Selection Search. If a Default value is entered, the fields are pre-populated, as show below.
|
| Allow for serialized selections during order mode | If this is set to "N", serialized selections in SSM are not possible: neither when making the initial selection, nor when placing an order. If this option is set to "Y", SSM displays a field to specify a serial number. |
| Allow for serialized designations in add/edit item mode | If set to a "Y", then this option will enable the ability to specify serial numbers during item add or item edit. |
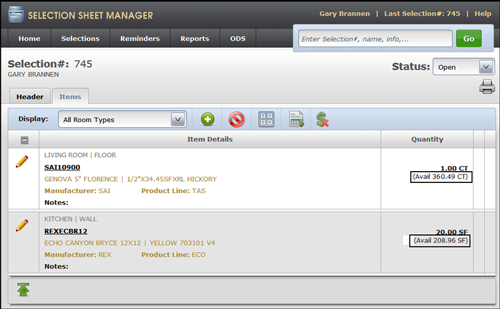
| Show available inventory on item tab |
If this setting is set to a "Y", then under the quantity requested, we will show the available quantity of this item based on the user's warehouse settings.
|
| Omit Restriction Code in Item Add/Edit Mode |
Restriction codes are generally assigned to rolled goods and can be for situations such as:
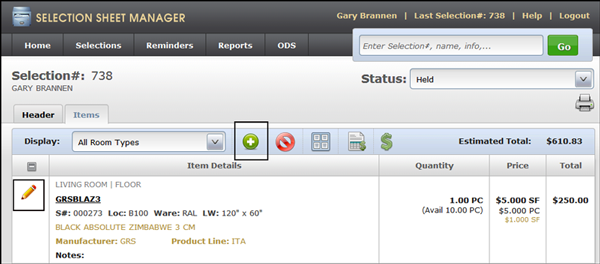
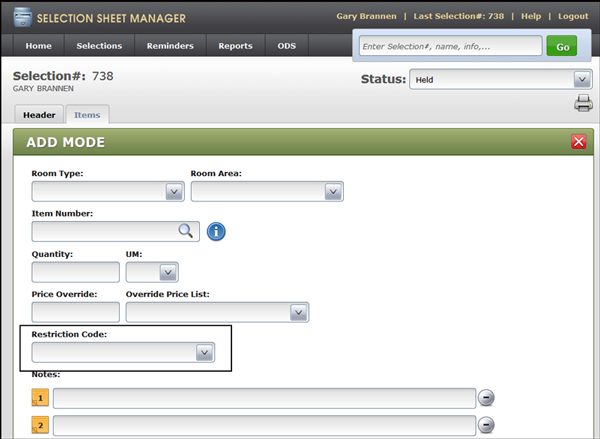
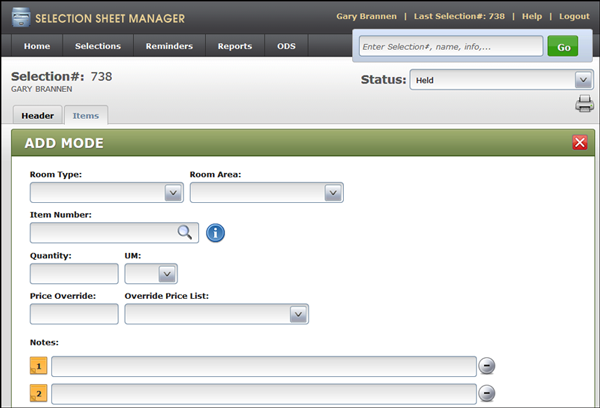
This setting allows you to not display the restriction code drop down menu when adding a new selection sheet or editing an existing one. This functionality applies to both the Edit mode, accessed by clicking the pencil icon to the left of an item, and the Add mode, accessed by clicking the add icon at the top of the window.
With setting not activated; the default (Add Item Mode)
With setting activated (Add Item Mode)
|
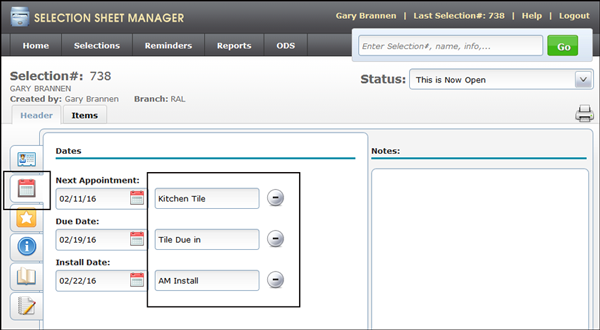
| Enable Additional Date Information |
This setting activates comment fields the right of each scheduled appointment; in the Item tab. These 13 character fields can be used to enter information about the appointment.
|
| Alternate Address Title |
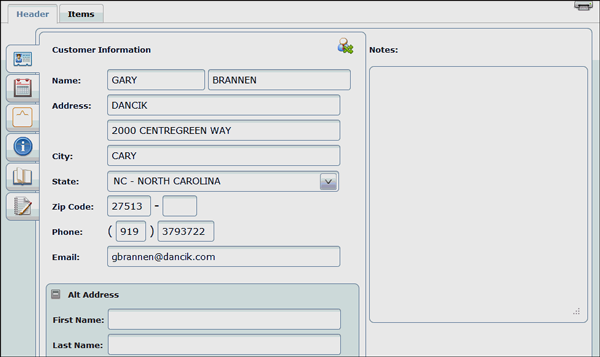
This section on the Consumer Header lets you enter a different address from the consumer's billing address.
The Alternate Address is only related to the printed selection sheet. It is not passed to or saved. The Alternate address prints along side the Consumer address when the selection sheet is printed. |
| Consumer Name Print Default |
Enter a "Y" to set the printing default to print the Consumer Address title at the top of the Selection Sheet. |
| Print Summary Page |
The summary page provides a price breakdown by room. A summary page only appears if the selection sheet includes pricing information. Enter a "Y" in this field to set the printing default to always print a summary page. |
Screen 4 - Default Print Settings
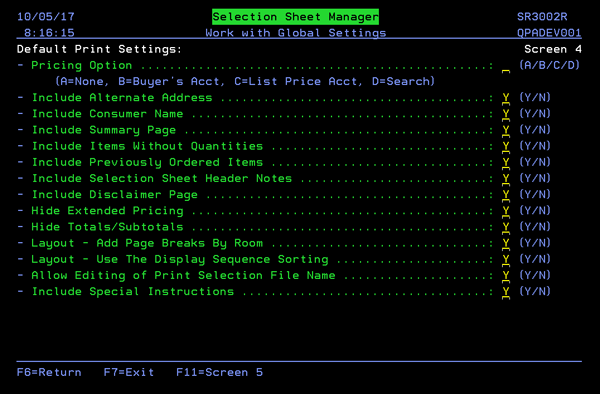
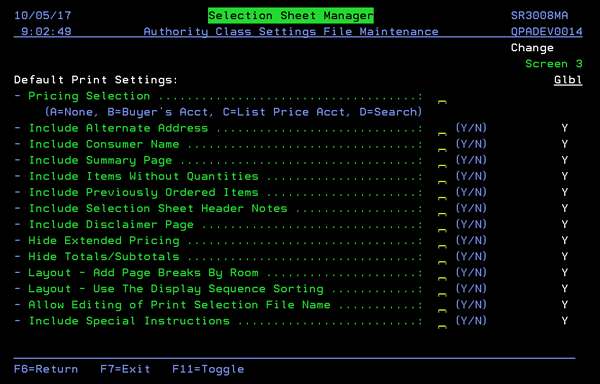
The default print settings shown above correspond to the Print Selection options on the window that appears, shown below, when printing a selection sheet.
Activate a setting(s) to ensure it is always selected when printing a Selection Sheet.
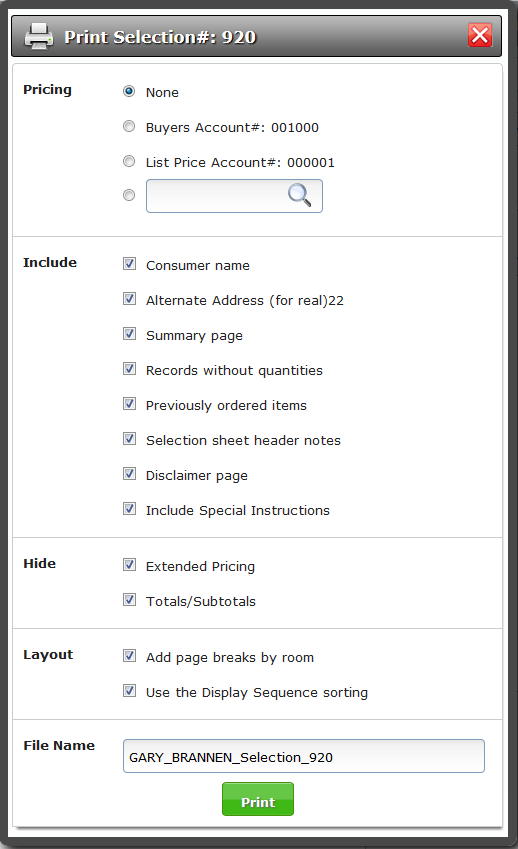
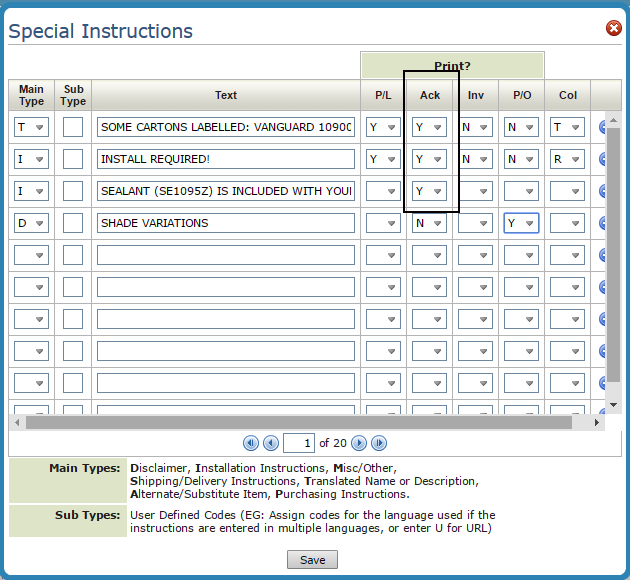
The setting Include Special Instructions allows special instructions, from the Item File, to print on selection sheets. The special instructions are added to the printed document, under the item. Special instructions can inform customers of special needs, in writing, for their selections, at the line level, before they actually purchase the material.
The special Instructions are pulled from the Item File. Messages flagged with a "Y" in the Ack column are included on the Selection Sheet.
Screen 5 - Default Email Settings for Selections
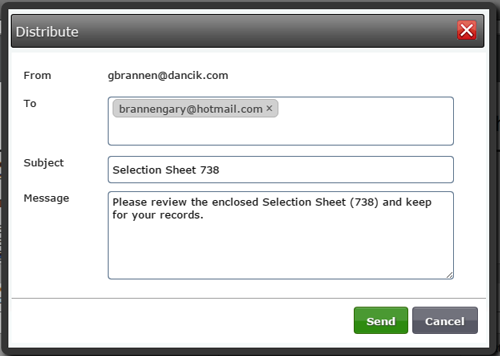
Screen 5 of the global settings contains settings to create defaults for the outgoing email.
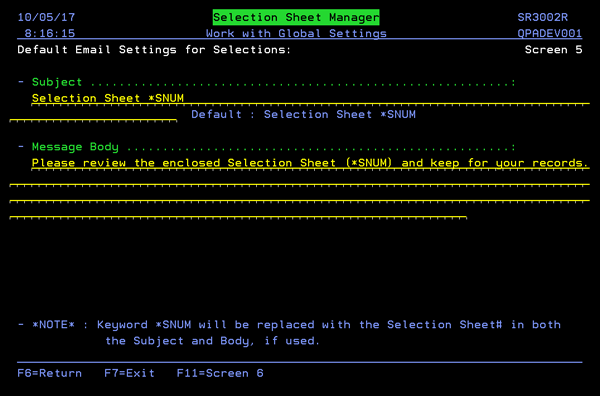
The KeyWord *SNUM is replaced by the selection sheet number in the subject and/or body of the email.
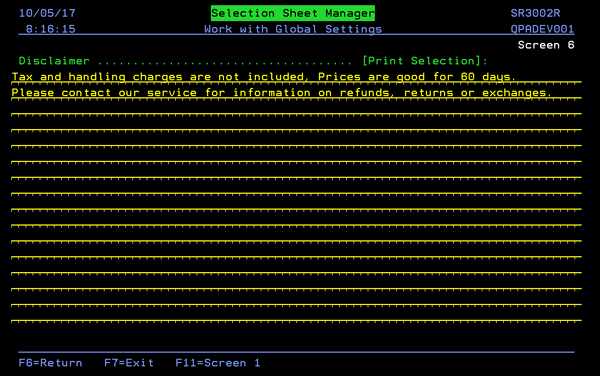
Screen 6 - Disclaimer
We recommend you enter a continual line of text. Do not use spaces to go to the next line. The spaces will actually show up as spaces on the printed disclaimer. To start another line, click at the beginning of the line.
Screen 7 - Attachments and SSM Notification Options
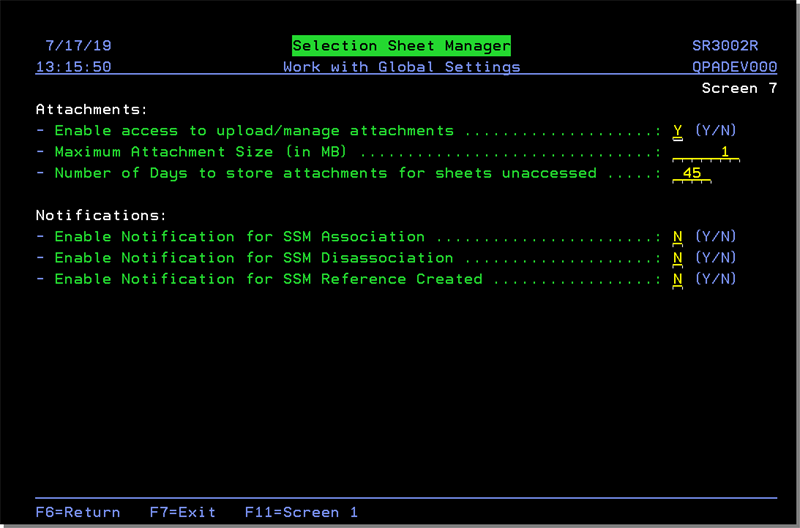
Attachments
The setting Number of Days to store attachments for sheets unaccessed allows you to configure when the system will auto cleanup attachments from sheets that haven't been accessed.
A Night Job utility will take sheets that have not been touched for longer than this setting, and delete attachments from the system from those selection sheets. The log of sheets that have been automatically purged in this manner can be seen via the SSM interface under Reports.
Notifications
The options in the Notifications section control whether or not an email is sent when Selection Sheet Numbers (SSM#) are assigned to orders in Navigator Order Management.
Associated File:
- The NAV 5 setting Allow Access to add/edit/remove Selection Sheet Associations was added to the Application Permissions for Navigator Order Management. Path: NAV 5 > W=WebApps > A - OM > Allow Access to add/edit/remove selection sheet associations
Authority Class Settings - SSM 2
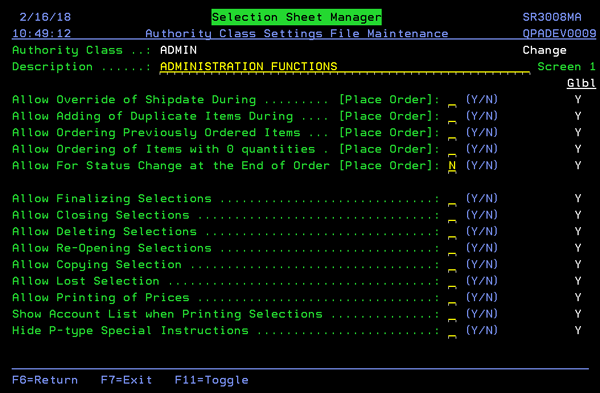
Authority classes allow you to group users together, they can be created based on system access restrictions or on a user's functional areas such as Power Users or Admin. They allow you to customize the level of access a group of users has within Selection Sheet Manager.
Screen 1
| Field | Description |
| Allow Override of Ship date During | Flagging this field to Y grants all Selection Sheet Manager users the ability to override ship dates. |
| Allow Adding of Duplicate Items During [Place Order] | By flagging this option to N (the default) you can minimize potential errors caused by fast double-clicking on the mouse. |
| Allow Ordering Previously Ordered Items | This flag, when set to Y, allows users to order items that have been ordered from the same selection sheet. |
| Allow Ordering of Items with 0 quantities | If this field is set to N, items that have a quantity of 0 will not even appear on the Selection Sheet Manager order form. |
| Allow For Status Change at the End of Order Process |
Activate this option to display a drop down menu on the last window of the selection process. This option works in conjunction with menu option SSM 15 - Work with Status to provide more detailed status codes for selection.
|
|
Allow Finalizing Selections Allow Closing Selections Allow Deleting Selections Allow Re-Opening Selections Allow Copying Selections Allow Lost Selections |
Flag these to Y to grant authority and N to deny access.
|
| Allow Printing of Prices | Enter a Y to allow prices to print on any reports generated. Enter an N to disable prices from printing. |
| Show Account List when Printing Selections | Activating this field, by entering a Y, directs the system to show all possible accounts used for pricing. |
| Hide P-type special instructions |
Enter a Y to hide notes/special instructions that are not applicable to sales. Purchasing Notes are included in the Product Knowledge section of the Item Detail window; unless they have been flagged to not appear. The Item Information window is accessed by clicking the item details icon
|
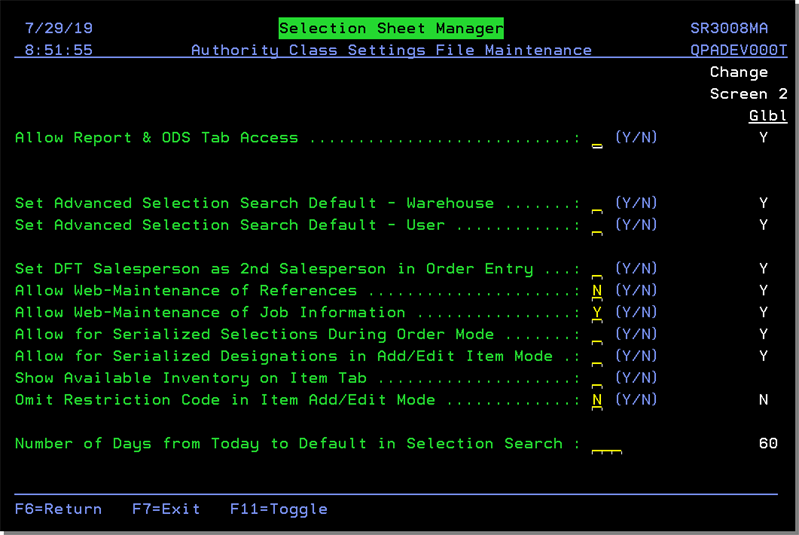
Screen 2
| Field | Description |
| Allow Report & ODS Tab Access |
Enter a Y to display the Reports and ODS tabs on the Selection Sheet Manager.
The Reports tab gives access to reports that can be generated by a variety of parameters (status, manufacturer, item, area, room, etc.). The ODS tab provides easy access to the reports generated via the Reports tab. In order for a user to be able to access and work with the reports posted to ODS, they also need to have authority granted for the same profile on the iSeries via menu option ODS 1. Within ODS 1, find the option Work w/Reports Posted to Web and grant access. |
| Set Advanced Selection Search Default - Warehouse Set Advanced Selection Search Default - User |
Activating these options directs Selection Sheet Manager to use the default warehouse and/or user when searching through selection sheets. These 2 fields define the advanced search options for searches done via the master search bar. If set to "Y" only selection sheet results that my user created or are from my warehouse are returned. With these turned to "N" (which most people have at least initially all sheets are returned regardless of who put them in or from which warehouse/branch. |
| Set DFT Salesperson as 2nd Salesperson in Order Entry |
This setting, if activated, takes the default salesperson associated with your SSM user and uses it on the Header of the order (step 3 of the order process) as the secondary salesperson during Selection Sheet Manager order entry. If this setting is not activated, the default salesperson is used as the primary salesperson, but this can be overwritten by the salesperson associated with the buyer account Billto. |
| Allow Web-Maintenance of References |
Activating this setting provides the ability to add/edit/delete references. If a "Y" is entered a toolkit icon appears which allows you to Add/Edit/Deactivate records. |
| Allow Web-Maintenance of Job Information |
This setting gives users permission to edit the Job Information on a Selection Sheet. If a "Y" is entered a toolkit icon appears on the Job information tab.
This toolkit icon allows you to Add/Edit/Deactivate records. Clicking the icon brings up the existing entries for that category; City, Construction, etc. Edit existing entries or add new ones as needed. To switch between job categories, use the drop down menu.
|
| Allow for serialized selections during order mode | If this is set to "N", serialized selections in SSM are not possible: neither when making the initial selection, nor when placing an order. If this option is set to "Y", SSM displays a field to specify a serial number. |
| Allow for serialized designations in add/edit item mode | If set to a "Y", then this option will enable the ability to specify serial numbers during item add or item edit. |
| Show available inventory on Item tab |
If this setting is set to a "Y", then under the quantity requested, we will show the available quantity of this item based on the user's warehouse settings.
|
| Number of Days from Today to Default in Selection Search |
|
Screen 3

Selection Sheet Manager User Settings - SSM 3
Screen_4_
These settings control the configuration and functionality of the Selection Sheet Manager for an individual user. User settings give you the flexibility to limit users to specific accounts and information. They have precedence over the global settings.
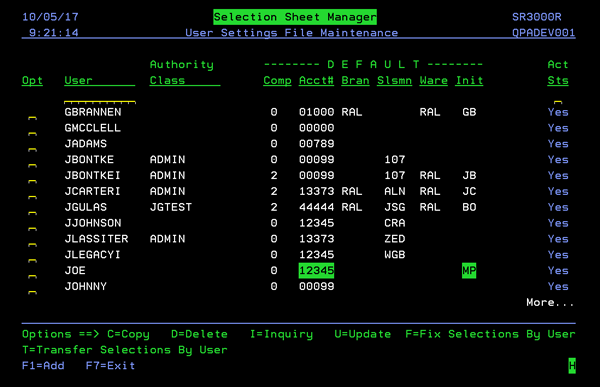
From this screen, you can add, delete, inquire on, or update information.
New users must be established within the core system AND have the the Auto-ISO Option activated before you can add them to the Selection Sheet Manager. The Auto-ISO Option is located on screen 2 of the Work Station Control Panel (Menu SET Option 1).
The F = Fix Selections by User option allows you to transfer selection sheets from an inactive user to an active one.
The T=Transfer Selections By User option allows you to transfer selection sheets between active users. For more information refer to Selection Sheet Manager Set-Up Options.
Screen 1
| Field | Description |
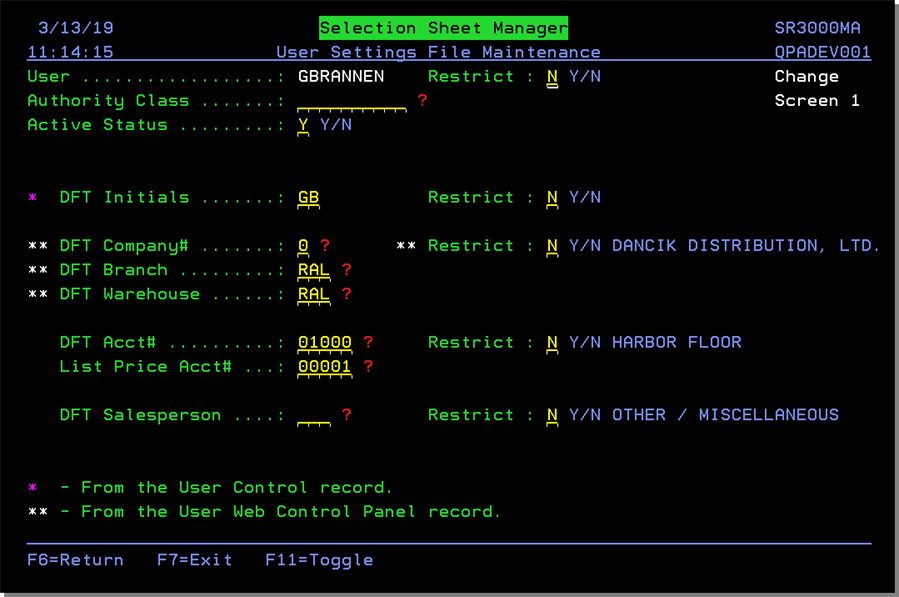
| User | The user name entered must be a valid user profile with access to the iSeries. |
| Active Status | Sets user to an active (Y) or inactive (N) status. This setting (No or Yes) appears in the Act Sts column on the User Listing screen. |
| Restrict (User) | Restricts this user to only have access to his/her created selection sheets. |
| Default Initials | These initials appear on the Order Window screen. |
| Default Company# | The default company associated to this user. |
| Default Branch | The branch that appears on the Order Window screen. |
| Default Warehouse | The warehouse that appears on the Order Window screen. |
| Default Account# | The account used for pricing. |
| List Price Account# | Enter an account number that represents list or retail pricing. This account is used to print a selection sheet with list or retail prices when the selection sheet is for a customer that has discounted pricing. |
| Default Salesperson |
The salesperson that appears on the Order Window screen and on inquiries and reports. If this field is left blank, the default for not entering a salesperson from the Salesperson file (FIL 7) is used. In most cases, this default is Other/Miscellaneous. This field is not linked to the Limit to SLMN# on the User ID Control Panel (SET 2). |
| Restriction Fields | |
|
Restrict (Default Initials) Restrict (Company#) Restrict (Account#) Restrict (Branch) Restrict (Salesperson) Restrict (Warehouse) |
These fields control a users access. Enter a N to deny a user access to any information other than their assigned default. |
Screen 2
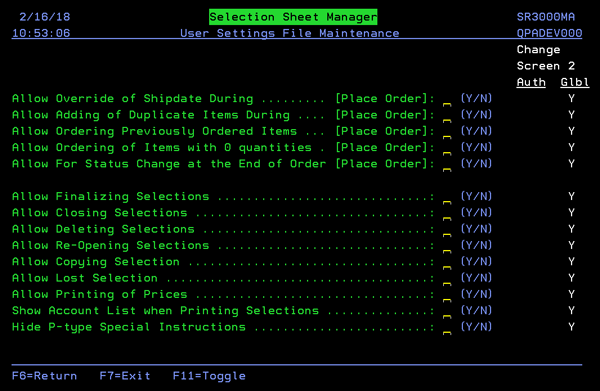
| Field | Description |
| Allow Override of Ship date During | Flagging this field to Y grants all Selection Sheet Manager users the ability to override ship dates. |
| Allow Adding of Duplicate Items During [Place Order] | By flagging this option to N (the default) you can minimize potential errors caused by fast double-clicking on the mouse. |
| Allow Ordering Previously Ordered Items | This flag, when set to Y, allows users to order items that have been ordered from the same selection sheet. |
| Allow Ordering of Items with 0 quantities | If this field is set to N, items that have a quantity of 0 will not even appear on the Selection Sheet Manager order form. |
| Allow For Status Change at the End of Order |
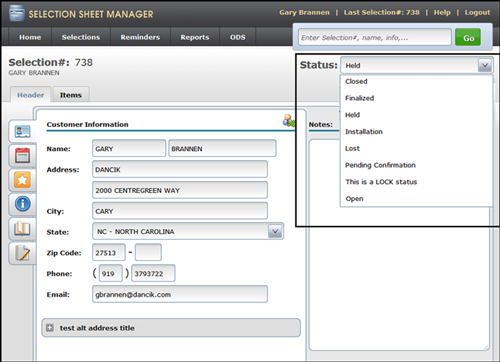
Activate this option to display a drop down menu on the last window of the selection process. This option works in conjunction with menu option SSM 15 - Work with Status to provide more detailed status codes for selection.
|
|
Allow Finalizing Selections Allow Closing Selections Allow Deleting Selections Allow Re-Opening Selections Allow Copying Selections Allow Lost Selections |
Flag these to Y to grant authority and N to deny access.
|
| Allow Printing of Prices | Enter a Y to allow prices to print on any reports generated. Enter an N to disable prices from printing. |
| Show Account List when Printing Selections | Activating this field, by entering a Y, directs the system to show all possible accounts used for pricing. |
| Hide P-type special instructions |
Enter a Y to hide notes/special instructions that are not applicable to sales. Purchasing Notes are included in the Product Knowledge section of the Item Detail window; unless they have been flagged to not appear. The Item Information window is accessed by clicking the item details icon
|
Screen 3
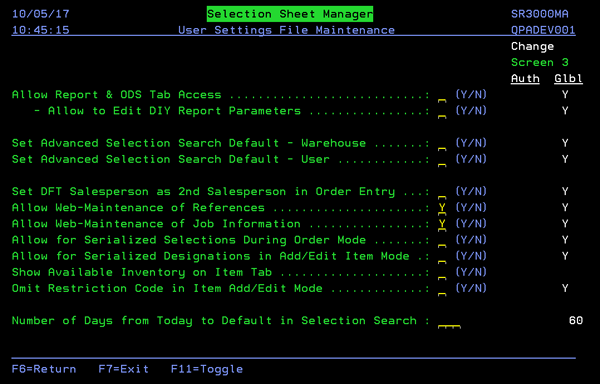
| Field | Description |
| Allow Report & ODS Tab Access |
Enter a Y to display the Reports and ODS tabs on the Selection Sheet Manager.
The Reports tab gives access to reports that can be generated by a variety of parameters (status, manufacturer, item, area, room, etc.). There is also a traffic report that can be generated and then customized as needed. The ODS tab provides easy access to the reports generated via the Reports tab. In order for a user to be able to access and work with the reports posted to ODS, they also need to have authority granted for the same profile on the iSeries via menu option ODS 1. Within ODS 1, find the option Work w/Reports Posted to Web and grant access. |
| Set Advanced Selection Search Default - Warehouse Set Advanced Selection Search Default - User |
Activating these options directs Selection Sheet Manager to use the default warehouse and/or user when searching through selection sheets. These 2 fields define the advanced search options for searches done via the master search bar. If set to "Y" only selection sheet results that my user created or are from my warehouse are returned. With these turned to "N" (which most people have at least initially all sheets are returned regardless of who put them in or from which warehouse/branch. |
| Set DFT Salesperson as 2nd Salesperson in Order Entry |
This setting, if activated, takes the default salesperson associated with your SSM user and uses it on the Header of the order (step 3 of the order process) as the secondary salesperson during Selection Sheet Manager order entry. If this setting is not activated, the default salesperson is used as the primary salesperson, but this can be overwritten by the salesperson associated with the buyer account Billto. |
| Allow Web-Maintenance of References |
Activating this setting provides the ability to add/edit/delete references. If a "Y" is entered a toolkit icon appears which allows you to Add/Edit/Deactivate records. |
| Allow Web-Maintenance of Job Information |
This setting gives users permission to edit the Job Information on a Selection Sheet. If a "Y" is entered a toolkit icon appears on the Job information tab.
This toolkit icon allows you to Add/Edit/Deactivate records. Clicking the icon brings up the existing entries for that category; City, Construction, etc. Edit existing entries or add new ones as needed. To switch between job categories, use the drop down menu.
|
| Allow for serialized selections during order mode | If this is set to "N", serialized selections in SSM are not possible: neither when making the initial selection, nor when placing an order. If this option is set to "Y", SSM displays a field to specify a serial number. |
| Allow for serialized designations in add/edit item mode | If set to a "Y", then this option will enable the ability to specify serial numbers during item add or item edit. |
| Show available inventory on Item tab |
If this setting is set to a "Y", then under the quantity requested, we will show the available quantity of this item based on the user's warehouse settings.
|
| Omit Restriction Code in Item Add/Edit Mode |
Restriction codes are generally assigned to rolled goods and can be for situations such as:
This setting allows you to not display the restriction code drop down menu when adding a new selection sheet or editing an existing one. This functionality applies to both the Edit mode, accessed by clicking the pencil icon to the left of an item, and the Add mode, accessed by clicking the add icon at the top of the window.
With setting not activated; the default (Add Item Mode)
With setting activated (Add Item Mode)
|
| Number of Days from Today to Default in Selection Search |

|
Screen 4 - Default Print Settings
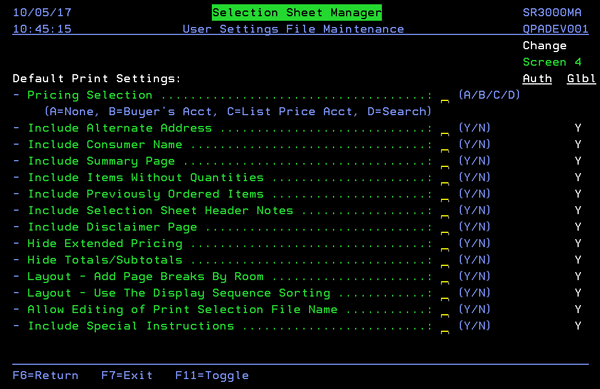
The default print settings shown above correspond to the Print Selection options on the window that appears, shown below, when printing a selection sheet.
Activate a setting(s) to ensure it is always selected when printing a Selection Sheet.

The setting Include Special Instructions allows special instructions, from the Item File, to print on selection sheets. The special instructions are added to the printed document, under the item. Special instructions can inform customers of special needs, in writing, for their selections, at the line level, before they actually purchase the material.
The special Instructions are pulled from the Item File. Messages flagged with a "Y" in the Ack column are included on the Selection Sheet.

Control User File Maintenance - SSM 5
This user administration program combines all of the user-related settings into one place. It combines all of the user defaults, security fields, and parameters related to any application, including web applications like IWMS, Selection Sheet Manager, and File Management.
User settings are the top level settings. They override the authority class and global settings.
Click here for detailed information on these settings.

 next to an item.